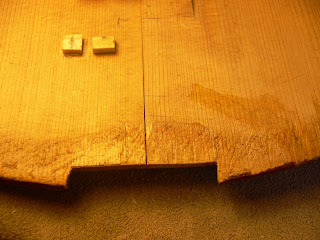
First repair project : After I took the front off, I could see that the major crack was caused by an inpact on the soundpost/bridge area. I put one spruce stud at each end of each crack to avoid it to crack further when cleaning the front. I spend a few days cleaning the 4 cracks, I was quiet lucky because the cracks where relatively clean so hot water was enough.
Then, I glued studs in pairs (one on each side of the crack). Those studs have to be fitted really well to the surface because a sideways clamping pressure will be used on them to close the crack when gluing.
A 2mm gap has to be left between each pair of studs (enough to insert a small wedge that will give me control on the angle of pressure.
Here you can see the 2mm gaps from each pair of studs are on a staight line (following the crack).
You can also see that the center joint is open. I will take care of that once the first crack will be closed.
This is a close view from the the lower end of the bass bar. It is part of the front and has been left as a volume when the inside of the front was carved. It is a common way to really quickly finish the inside of an (usually cheep) instrument. It has a disadventage: The grain is not following the same axe as the bass bar, so to get the same strength, the bar has to be left thicker and higher which is adding an undesirable extra mass.
Another view of the original bass bar.
On this photo, I wanted to show how quickly and careless the bass bar has been shaped.
The bass bar is not even straight!
That's a photo of the soundpost crack taken from the outside of the front.
A close look to the open center joint starting from the saddle.
The different tools to close cracks: This is the "end-crack clamp"
These are "J"-crack clamps (we made them last year in the tool making workshop).
"J"-crack clamps.
Here you can see the action of the "J"-crack clamps with studs and wedges! There are several "dry runs" with clamps and wedges to make sure everything is level and the arching isn't distorted by the pressure on the studs.
Studs and wedges.
The crack from the outside. It is well closed, the white line that you can see is wher the varnish chipped off.
This is covered by retouching when all the cracks are glued.
The first crack has been glued, but being quiet a long crack, only the first half was level so I decided to keep the good half as it is and start the second half again (unglue with hot water).
So on the first half I took the stud pairs away, first carved away with a chisel, then using hot water, I cleaned the area around the crack and made studs to glue right on the crack (to give the cracker area an extra support and make sure it never comes apart again).
This is the gluing of the open center jont. I used the stud pairs method again, but this time I used the two blue clamps (long reach clamps) and small pieces of plastic to help the crack to be level when gluing.
Here you can see the piece of plastic clamped on the crack to push it level.
This is a piece of Japanese paper used to reinforce a lightly damaged area.
Outside view from the closed soundpost crack. Can you see the impact prbably caused by the bridge foot (treble side)?
skip to main |
skip to sidebar


Followers
Blog Archive
About Me

- Emilio
- Newark, Nottinghamshire, United Kingdom
- Violin making is a real passion for me. I think it is one of the most beautiful arts because it is combining woodworking and music. I find it extraordinary to create something out of a piece of wood which is going to be used by the violinist to make a sound and create music! I also like the fact that every piece of wood is absolutely unique and so is every violin. Enjoy the photo's of my work! Emilio


1 comment:
Hi Emilio,
Your blog is very interesting and informative!
Could you please explain, how you made the "J" - crack clamps?
Thanks a lot in advance,
Arie Germansky
Post a Comment